
Print and Check a Sizing Card
What you are trying to accomplish
Print a PatternForge sizing card at its exact intended size, then check it with a physical ruler. The card gives PatternForge a trustworthy real-world reference when you photograph a paper pattern.
Choose the card for the paper that is actually in your printer: US Letter or A4. These are different sheets, not interchangeable names for the same page.
Why it matters
A photograph has no dependable real-world scale by itself. The sizing card connects distances in the photo to real measurements.
Printers and PDF viewers often turn on options such as “Fit to Page” or “Shrink to Fit.” A card printed that way can look perfectly normal while being the wrong size. If the card is wrong, every later measurement based on it can also be wrong. Automatic tools cannot discover that your printer quietly resized the sheet; the ruler check is essential.
Step by step
- Open Sizing cards in PatternForge.
- Find US Letter sizing card or A4 sizing card, matching the paper you will print on.
- Choose Download PDF.
- Open the PDF and start printing.
- In the print dialog, choose Actual Size or 100%. Turn off Fit to Page, Shrink to Fit, and Scale to Fit.
- Print one sheet.
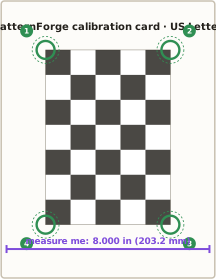
- Lay a ruler along the labelled verification line. The US Letter sheet is labelled 8.000 in (203.2 mm); the A4 sheet is labelled 200 mm (7.874 in).
- If the line is not exact, change the print scaling and print the card again. Do not try to correct a misprinted card later in PatternForge.
- Keep the card flat. Plain paper works; mounting it on flat cardstock or foam board can make repeated use easier.
What success looks like
- The card matches the paper size named on the sheet.
- The full printed board, corner targets, and verification line are present.
- The verification line measures exactly the length printed beside it.
- The sheet lies flat without curling or lifting.
You now have a physical size reference that can sit beside the pattern in a photo.
Common problems and recovery
- The line is slightly short or long: Reprint with Actual Size / 100%. Even a small error should not be accepted.
- The page is clipped: Confirm that the PDF and printer both use the same paper size. Then reprint.
- The printer keeps resizing: Look in advanced print settings for scaling, borderless enlargement, or fit options. Print one test sheet until the line is exact.
- The paper curls: Flatten it or mount it to a flat backing. The card and pattern need to share one plane in the photo.
- You do not have a printer yet: You can take the pattern photo, but the photo will not auto-size from a card. Plan to set the scale by hand later, and treat it as unchecked until you verify it.
- Auto-Calibrate finds the card: That Beta assist can locate and straighten the card, but it still cannot prove the physical sheet was printed correctly. Keep the ruler check.
Quick safety check
Before taking the photo, answer both questions:
- Does the paper name on the card match the paper you printed on?
- Does the labelled verification line measure exactly the printed value with a ruler?
If either answer is no, stop and reprint.
Related tools and next step
Next, read Capture a Clear Pattern Photo. After the photo is in PatternForge, use Set and Check True Size.
Last reviewed 2026-07-14. Editorial source topics: 5, 36.
This article teaches digitizing and sewing information. It does not replace fit testing, construction testing, or permission to digitize and distribute someone else’s pattern.