
Capture a Clear Pattern Photo
What you are trying to accomplish
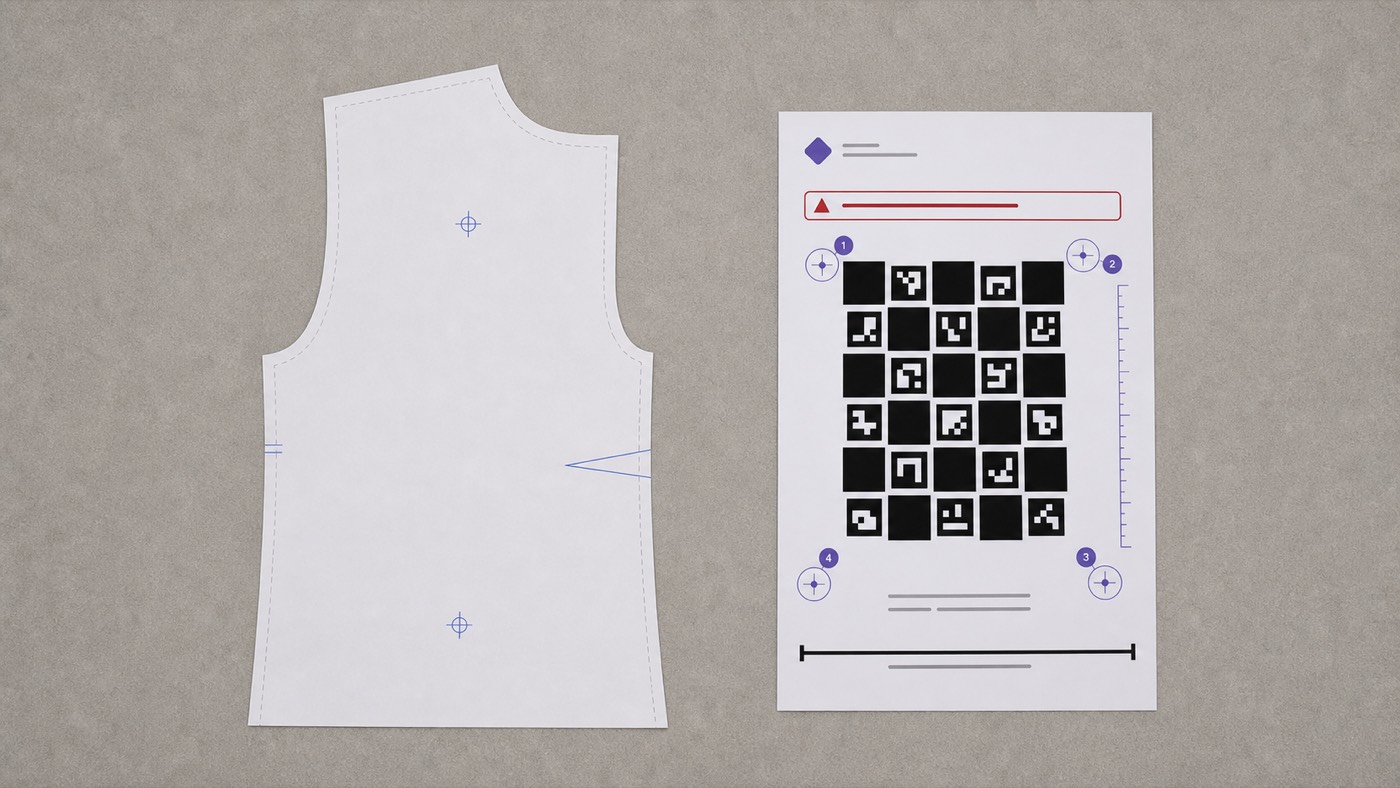
Make a sharp, straight-on photo in which the entire paper pattern area you need and the entire printed sizing card are easy to see. The photo should give you a clean source to trace and enough evidence to set true size.
Why it matters
A tilted camera changes apparent lengths across the image. A raised card, curled pattern, shadow, blur, or cropped edge can hide the line you meant to trace. Perspective correction can help with camera angle, but it cannot reconstruct a missing corner or decide which faint size line is the correct one.
A careful photo usually saves more time than repairing a poor trace later.
Step by step
- Print and ruler-check the correct sizing card before setting up the photo.
- Place the pattern and sizing card beside each other on one flat surface. Do not put the card on top of the pattern or on a raised object.
- Flatten folds and curls without covering the outline. If you use weights, keep them away from the line you need.
- Use bright, even light. Move lamps or yourself until hard shadows and glare leave the pattern edges.
- Hold the camera directly above the surface. Move farther away if needed so the lens is not very close to the paper.
- Frame the whole sizing card and the whole pattern area you intend to trace. Leave a little clear space around their edges.
- In PatternForge, choose Take photo or Choose from Photos. Open Show me how if you want to revisit the Take a great photo guide.
- Inspect the result before accepting it. Zoom in mentally on corners, curves, printed size lines, notches, and the sizing-card targets.
- Choose Use photo only when those details are sharp. Otherwise choose Retake.
What success looks like
- The pattern, sizing card, and surface are all on one plane.
- The camera view is close to straight down, not from the side.
- Every sizing-card corner and its verification line are visible.
- The intended pattern outline is sharp enough to distinguish from neighboring size lines.
- Nothing important is cropped, covered by a weight, lost in shadow, or washed out by glare.
Common problems and recovery
- PatternForge says the card was not spotted: Look at the photo yourself. If the card is cropped, blurred, very small, or partly covered, retake it. If the card is clear, you may still use the photo and set size by hand later; card detection is an aid, not proof.
- The photo is blurry: Add light, steady the phone, and retake. Digital sharpening cannot restore a reliable edge.
- White paper disappears into the background: Use a plain surface with gentle contrast and even light.
- A shadow crosses the outline: Move the light source or camera position and retake.
- Only part of a large piece fits: Take additional clear photos with useful overlap, but remember that each added photo needs trustworthy scale coverage. Do not assume separately photographed areas share one scale automatically.
- Several nested size lines are visible: Identify the intended size on the paper before tracing. A clearer photo does not choose the correct line for you.
- No sizing card is available: Capture is still possible, but automatic true sizing is not. The project must stay unchecked until you set and independently check scale another way.
Quick safety check
Before choosing Use photo, confirm that you can point to:
- all four corners of the sizing card;
- both ends of its printed verification line; and
- every section of the pattern line you plan to trace.
If you have to guess where any of those are, retake the photo.
Related tools and next step
If the card has not been checked yet, return to Print and Check a Sizing Card. Otherwise continue to Set and Check True Size.
Last reviewed 2026-07-14. Editorial source topics: 5, 36.
This article teaches digitizing and sewing information. It does not replace fit testing, construction testing, or permission to digitize and distribute someone else’s pattern.